I pledged for
Me Made May 2013 that I would make two new items during the month with no panic sewing. Well, I am happy to report, that I have finished my first one. Yay!
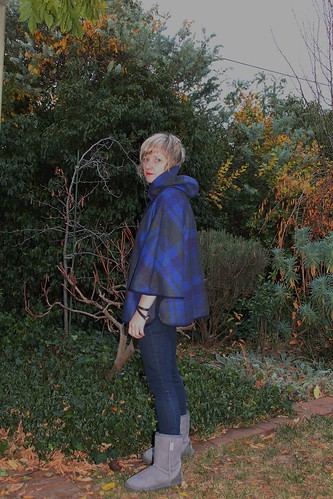
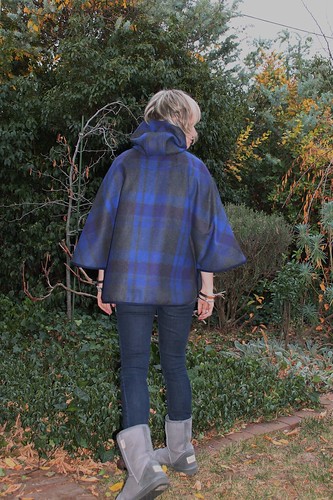
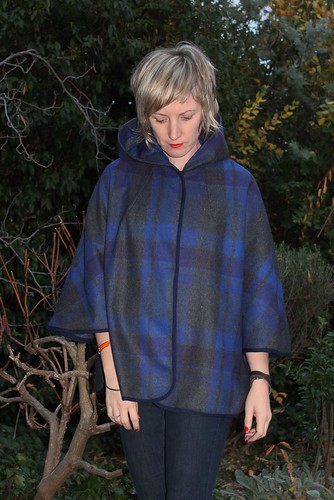
The Tessuti New York Cape. And here I am styling it with my new Mothers Day Ugg Boots!
I introduced the idea of making a cape way back in
January and quickly purchased the New York Cape pattern by Tessuti and then let it sit in the cupboard until last week, when I found this super cute tartan from
Addicted to Fabric with a blue in it that really pops and I knew that I had to have a cape in it. (Oh I also bought the pink colour way for something else..pants, a skirt.. tartan on tartan.. very Bay City Rollers) .
While there was no panic sewing per se, there were a few anxious moments with the binding on this little baby and I was always nervous about matching the tartan. I think the matching is ok, probably not perfect, but good enough not to annoy me. I had to recut one of the hood pieces because that WOULD have annoyed me.
The real killer was the binding around the cape with (On my original post I said 8 metres of wool binding.. while it may have felt like 8 metres it was only 4) wool binding. I had to unpick quite bit of binding (both inside on the seams and a little bit on the outside. Urrrgh). But that was all user error! I probably should have hand stitched the binding on. I can't fault the pattern which is excellent and comes with a lot of instructions and photos. I am constantly amazed though by those people that I've seen on the internet who have made one of these and then straight after, another one for their child. Not me. I don't want to see binding for quite some time.
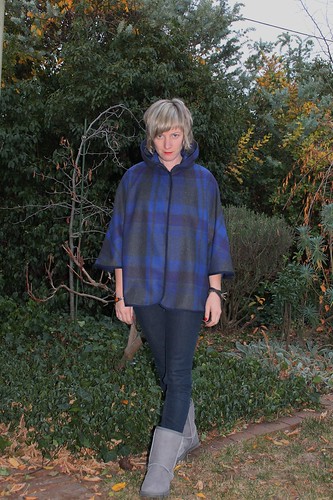
The pattern is one size fits all which I was also a bit worried about as I'm quite small, so I took 2 inches off the length and about 1 inch of the width. Of course, with removing the width, I kind of stuffed the front for the button holes, but in the end I didn't really want the buttons on the front anyway. In fact I was just going to have it hang open, but finally just put a little press stud on the top inside until I work out a better option... or maybe it will just stay like that forever as I'm really loving the look without the buttons. I did include buttons under the arms as per the instructions, but I forgot to photograph them.
Overall I'm pretty happy with this make. I think my New York Cape will get a whole lot of wear this Canberra Autumn.


This. Is. Awesome. I love this so much!
ReplyDeleteA cape with a hood - amazing! I love your fabric choice, and although the binding sounds like a right pain to do it does look great! It looks perfect for autumn.
ReplyDeleteI love it! I think it would look great with a toggle or frog at the neck closure too!
ReplyDeleteThanks Michelle. Funny you should say that. I had originally thought I'd do a 'duffle coat' like toggle but spent an age with Sam down at A2F (btw, wish I'd know you were quilting down there....) and we couldn't find anything that we liked. So, one day I think I'll come across the perfect closure.. but until then, I will be more than happy with this.
ReplyDeleteThanks Kathryn. I suspect that every MMMay day will have 'plus cape!'.
ReplyDeleteThanks Amanda. I reckon you need one now.
ReplyDeleteIt's so cool!!!!! I love it. if I lived closer I'd sneak over and try to steal it! :P
ReplyDeleteOh, I love it! I think you made the right call leaving off the buttons - it looks perfect as it is. I'm so making one of these next fall!
ReplyDeleteThanks Gillian. I can't believe it's still snowing where you are. Perhaps you'd better abandon summer sewing and get making a cape!
ReplyDeleteThanks Gail. I'll be waiting to see yours for sure.
ReplyDeleteI told you, you can do it! 8 metres of binding would drive me totally nuts, but you nailed it!
ReplyDelete8m of wool binding! Holy moly! The results are worth it, though, it looks incredible. Fantastic fabric.
ReplyDeleteThis cape is perfect! Absolutely adore it! What a fantastic job you have done. :) xx
ReplyDeleteLemon-freckles.blogspot.co.uk
Thank you so much!!
ReplyDeleteThanks Morgan. I completely underestimated how long this binding would take me!
ReplyDeleteThanks Inna. I should have added the 5 used on the inside seams. Aaaaaah. I have to bind a quilt this week for my brother's new baby. This could be the end of it for me. At least I think hand stitching them on is a it easier.......
ReplyDeleteI love the cape and the blue looks great on you! Based on the print, I agree with leaving the buttons off. The pattern matching looks great to me. Ah - Bay City Rollers S-A-T-U-R-D-A-Y Night! I think as long as you make the pants long enough there's no danger of a comparison!
ReplyDelete8 metres, holy ****!! Well done! it's worth it thought from the front the binding looks really clean and chic. I agree looks great without the buttons as well. I think the pattern really suits your style.
ReplyDeleteI'm so nervous about matching plaids so I've purposely stayed away from them, my time will come though.
That's so nice! Love it sans buttons. Is it practical to wear? :)
ReplyDeleteI'm seriously contemplating it...
ReplyDeleteThanks Zo. I'm hoping to wear it tomorrow so will let you know :)
ReplyDeleteThanks Amy. Oh plaids and binding. Double trouble. Just when you think you've matched the plaid your realise that there is a curve that doesn't match at all..
ReplyDeleteGorgeous! Already bookmarked the pattern - I have a cheap RTW one that I have worn a lot this spring, so a me made is going toward the top of the list!
ReplyDeleteWow this is stunning! I'm baffled how you came to use 8 mtrs of binding for the outer edges of the cape! My three NY capes took up 5 mtrs however when selling the pattern we thought we'd add an extra .50cm to the meterage for the outer binding, to be safe. I'm keen to get your feedback as to how you needed so much for yours.
ReplyDeleteregards and thanks
Colette
Ps would you allow me to share your version on our Sew Tessuti blog, linking back to you of course.
Colette, you are right and I'm a dill! For some reason I had 8 in my mind, but of course on looking back it was only about 4. I think I got confused with the total amount used... sorry about that! And yes, of course I'd be so excited for you to link to the cape. It really is a wonderful pattern. Well done to you for designing it.
ReplyDeleteFor the record, it wasn't 8 metres on the outside. After all that binding and matching of plaid my mathematics left me...
ReplyDeleteHi Morgan, just a quick update, I made a mistake and it was about 8 metres in total.. for both the inside and outside.
ReplyDeletefabulous! I just adore that blue!
ReplyDeleteI love the look of a cape, but always wonder... what do you do with your handbag?
Good call re the handbag! I noticed for the first few times I wore it I just let my handbag hang down by my side... but now I've reverted back to slipping it over my shoulder. The cape probably bunches a bit at the sleeves but it's actually ok :)
ReplyDeleteLove this one so I am in the middle of sewing one for my son's girlfriend who has a broken elbow! I am not sure I will want to give it up! So will have to make one for my self and my daughter! I am using strips of Ponti as a cheap alternative to the very expensive wool binding! I think it looks ok?
ReplyDeletePenny, I agree you need to make two! What a perfect present for anyone, but especially if they have a broken elbow. You are a lovely mother 'in law'.I think the ponti is an inspired choice for the binding.
ReplyDelete